How to Unlock All Legendary Blueprints & Items in Arc Raiders

Embark Studios’ Arc Raiders rewards patience, strategy, and exploration with its most coveted prizes: legendary blueprints and items. Unlike epic or common gear, these yellow-rarity treasures are intentionally rare, defining endgame power and offering unique gameplay advantages-from game-changing weapons to transformative attachments.

Many players mistakenly grind for hours, confusing epic loot for legendary gear. The truth is simple: there are only two core legendary items in Arc Raiders, and all legendary blueprints tie to specific bosses, events, or long-term projects. This guide breaks down every method to unlock all legendary ARC Raiders BluePrints and items, cutting through the grind and helping you claim your endgame rewards.

First: Understand Legendary Gear in Arc Raiders

Before diving into unlock methods, it’s critical to distinguish between legendary items and blueprints. Legendary items are rare, boss-exclusive components, while legendary blueprints are crafting recipes for top-tier weapons, attachments, and gadgets.

A key detail: Legendary items cannot be found in random containers or standard loot zones. Their drop rate from common sources is less than 1 in 100,000, making boss farming the only reliable way to obtain them. Similarly, legendary blueprints require targeted effort-they won’t spawn randomly during casual raids.

All legendary gear serves a purpose: legendary items are used to craft legendary weapons, while blueprints unlock permanent crafting recipes. Once learned, blueprints let you craft the item infinitely (with the right materials), making them a long-term investment.

Method 1: Farm Legendary Items (Reactors) from Endgame Bosses

There are exactly two legendary items in Arc Raiders: the Matriarch Reactor and the Queen Reactor. Both are dropped exclusively by endgame bosses in the Stella Montis underground facility and are required to craft the game’s most powerful weapons.

Matriarch Reactor (Legendary Item)

The Matriarch Reactor is dropped by the Matriarch boss, a high-difficulty enemy located in the Stella Montis underground facility. This boss only triggers after completing Northline Update progression or meeting specific raid conditions.

Farming the Matriarch is not a solo task-it requires a squad of 3+ players, high-level gear, and defensive augments. The boss has massive durability and lethal attacks, so coordination is critical.

Rewards for defeating the Matriarch include the Matriarch Reactor (used to craft the Aphelion legendary rifle) and the Aphelion blueprint itself. Note that the reactor is not a guaranteed drop, so repeated runs may be needed.

Queen Reactor (Legendary Item)

The Queen Reactor is dropped by the Queen boss, another extreme-difficulty enemy found in Stella Montis and during Harvester map conditions on Dam Battlegrounds, The Blue Gate, or Spaceport maps.

To trigger the Queen, you’ll need to complete specific Stella Montis quests or defeat enough minions to draw her out. Like the Matriarch, she requires a squad-her arsenal includes lethal area-of-effect attacks and heavy armor.

The Queen Reactor is used to craft two legendary weapons: the Equalizer pistol (a close-quarters powerhouse) and the Jupiter SMG (ideal for fast-paced combat). She also drops rare materials and the Equalizer/Jupiter blueprints occasionally.

Method 2: Unlock Legendary Blueprints via Map Events

Most legendary blueprints are tied to special map conditions or limited-time events, which boost drop rates and introduce unique loot containers. The Harvester and Close Scrutiny events are the most valuable for blueprint farming.

Harvester Event (Equalizer & Jupiter Blueprints)

The Harvester event is a map condition available on Dam Battlegrounds, The Blue Gate, or Spaceport. It features a mini-puzzle where players collect cells to unlock three large loot containers at the end.

These containers have a high chance to drop the Equalizer and Jupiter legendary blueprints-two of the most sought-after recipes in the game. The event also doubles trial quest points, making it a efficient way to multitask progress.

To complete the Harvester event, clear surrounding Arc enemies, collect cells from top platforms, and breach the final containers. Team up to avoid being overwhelmed by the Queen, who often spawns during this event.

Map Modifiers (Kinetic Converter & Anvil Splitter Blueprints)

Legendary attachment blueprints, like the Kinetic Converter and Anvil Splitter, are rare but can be farmed during specific map modifiers. Night Raid, Cold Snap, and Electromagnetic Storm all increase blueprint drop rates significantly.

The Kinetic Converter (a transformative stock attachment) has the highest spawn chance at the control tower in Dam Battlegrounds’ southeastern area, near the Research & Administration section. Look in lockers and containers at the top of the tower for the best odds.

The Anvil Splitter (a tech mod for the Anvil rifle) is commonly found in Buried City’s pharmacy building. This attachment converts the Anvil’s single heavy shot into four piercing projectiles, making it a game-changer for mid-range combat.

Method 3: Complete Long-Term Projects for Legendary Rewards

Arc Raiders’ permanent and limited-time projects offer guaranteed legendary blueprints and items for dedicated players. Two projects stand out: the Trophy Display Project and community events like the Candleberry Banquet.

Trophy Display Project (Permanent)

The Trophy Display Project is a five-stage, permanent challenge that tasks players with hunting Arc enemies and collecting specific machine parts. It has no fixed end date, so you can farm cheap ARC Raiders Materials at your own pace.

Later stages of the project reward legendary weapon blueprints, rare materials, and even a legendary weapon. For example, Stage 2 (Soaring Menaces) rewards the Vita Shot blueprint, while late stages unlock high-tier weapon recipes.

You can stockpile materials for future stages in your stash, so start farming early-focus on collecting Surveyor Vaults, Wasp Drivers, and Hornet Drivers for efficient progress.

Community Events (Limited-Time)

Limited-time events like Flickering Flames and its Candleberry Banquet project offer exclusive legendary rewards. The Flickering Flames event, which ran from December 2025 to January 2026, rewarded the Bettina III weapon and Kinetic Converter blueprint for completing its five stages.

These events require collecting event-specific materials (like Candleberries) and completing simple tasks. While past events have ended, Embark regularly introduces new ones-follow official announcements to avoid missing out on legendary rewards.

Pro Tips for Efficient Legendary Farming

Legendary gear requires patience, but these tips will speed up your progress and avoid frustration:

Team Up: Bosses like the Matriarch and Queen are nearly impossible to defeat solo. Coordinate with a squad via Discord or the Arc Raiders subreddit to clear high-difficulty content faster.

Prioritize High-Risk Zones: Locked rooms (accessible via keycards) and red-tier security areas have the highest blueprint drop rates. Focus on these locations during raids, especially during map modifiers like Night Raid.

Secure Extraction: Once you find a legendary blueprint or item, place it in a safe pocket to avoid losing it if you die. Plan your route to hit high-loot areas first, then head to extraction quickly.

Recycle Wisely: Legendary items like the Matriarch and Queen Reactors can be recycled for Power Rods and Magnetic Accelerators, but only do this if you already have enough to craft your desired weapons.

Common Mistakes to Avoid

Don’t Confuse Epic and Legendary: Epic gear is common, but legendary items are yellow-rarity and boss-exclusive. Don’t waste time looting common containers for legendary rewards-focus on bosses and events.

Don’t Rush Bosses: The Matriarch and Queen require high-level gear and coordination. Rushing into fights without a plan will result in repeated deaths and wasted time.

Don’t Skip Events: Limited-time events like Harvester and Flickering Flames are the only reliable way to get specific legendary blueprints. Missing these events means waiting for them to return.

Final Thoughts

Unlocking all legendary blueprints and items in Arc Raiders is a test of dedication, but the rewards are worth the grind. From the game-changing Aphelion rifle to the transformative Kinetic Converter, these treasures redefine endgame combat and make every raid more rewarding.

By focusing on boss farming, leveraging map events, and completing long-term projects, you’ll collect every legendary item and blueprint in no time. Remember to team up, prioritize high-risk zones, and stay updated on limited-time events to avoid missing out.

Whether you’re a casual raider or a dedicated endgame grinder, legendary gear is the ultimate symbol of progress in Arc Raiders. Follow this guide, stay consistent, and soon you’ll be dominating raids with the game’s most powerful tools.


ARC Raiders:The Right Way to Start Your Next Expedition

Beginning a new Expedition in ARC Raiders can be daunting. An initial reset means starting with empty inventories, limited blueprints, scarce resources, and minimal medical supplies. While it might be tempting to dive into PvP right away, this early stage isn’t the time to challenge everyone in the lobby. Instead, focusing on creating a solid foundation for long-term progression is the smarter play.

This guide details the best strategies for kickstarting a new Expedition in ARC Raiders, including raid priorities, the value of quests, opportunities for financial gain, material farming, Scrappy upgrades, and skill tree planning.

1.Define Your Raid Objective Before You Deploy

    The most crucial decision takes place before you enter the game.

    Early resets demand discipline. You probably don’t have:

    Robust blueprints
    Ample healing supplies
    Backup gear kits
    Sufficient Space Dollars

    If you find yourself in a loot situation, focus on looting and extracting. Avoid unnecessary conflicts, especially when you’re carrying quest items or rare materials, as these can set you back significantly if you die.

    Many players have faced the frustration of losing quest items, only to encounter bugs or the need to re-farm. It’s entirely preventable. Establish your priorities and adhere to them.

    2.Should You Complete Quests Early?

      While it’s not mandatory to finish story quests for an Expedition, doing so early is highly beneficial.

      Completing the entire storyline grants access to powerful blueprints, including:

      Trigger Grenade Blueprint
      Lure Grenade Blueprint
      The Cracker Blueprint
      Braleta Blueprint

      These items prove advantageous in both PvP and PvE scenarios. Additionally, you’ll accumulate more resources and progression benefits that will compound as you progress.

      3.Prioritize Money Runs

        In ARC Raiders, Space Dollars are essential.

        Establishing a solid financial base enables you to:

        Purchase weapons like the Renegade
        Buy healing items
        Acquire smoke grenades
        Prepare for future Expeditions with necessary entry costs

        After a reset, experienced players quickly focus on money routes. What’s important is consistency; even low-risk runs that prioritize extraction can result in substantial financial growth over time.

        By the time the next Expedition requires funds, you’ll be ready while others scramble to gather them.

        4.Focus on Material Farming Early

          The second key strategy during the early reset is to gather crafting materials right away. Key materials include:

          Seeds
          Metal parts
          Fabric
          Mechanical components
          Electrical components
          Advanced electrical components

          Recycling is invaluable. Dismantle excess materials to build up the required components for future crafting.

          There’s nothing more frustrating than having a great PvP session, only to find you’re out of fabric to make a bandage. Prioritizing materials now will save headaches later.

          5.Upgrade Scrappy Early

            Scrappy often goes overlooked, especially by newcomers.

            Upgrading Scrappy provides passive material returns, and interestingly, it can recover more items if you die. This enhancement makes early upgrades exceptionally worthwhile.

            Investing in Scrappy early ensures you’re consistently acquiring resources, even during challenging sessions. It’s one of the most effective long-term investments in the game.

            6.Plan Your Skill Tree for the Long Haul

              The skill tree in ARC Raiders is personal, but early planning is essential.

              Many top players share their chosen builds, providing valuable reference points. Whether you opt for aggressive PvP configurations or balanced PvE survivability trees, consistency is key.

              Avoid spending skill points haphazardly. Every point counts at the beginning. Align your build with your raid objective to ensure efficient character development.

              7.The Importance of Early PvP Discipline

                PvP is an exciting feature of ARC Raiders, but at the start, preparation is paramount. Once you’ve:

                Built up a financial cushion
                Stockpiled materials
                Upgraded Scrappy
                Completed story rewards
                Optimized your skill tree
                You can engage in more fights with less risk of stagnation.

                Playing smart in the early stages allows you to transition to a more aggressive playstyle later.

                When your foundation is solid, your inventory will be filled with valuable ARC Raiders Items, your blueprints will be unlocked, and your economy will be stable. Whether you choose to grind for everything yourself or purchase cheap ARC Raiders BluePrints for quicker progression, proper preparation sets apart successful players from the frustrated ones.

                Complete Guide to the Ring of Suffering in OSRS

                In Old School RuneScape (OSRS), few accessories offer the same combination of defense, utility, and convenience as the Ring of Suffering. Designed primarily for defensive setups, this powerful Zenyte ring is especially popular in high-level PvM encounters where survivability and passive damage matter. Boss fights such as Zulrah, God Wars Dungeon encounters, and certain Wilderness bosses become significantly easier when you have this ring equipped.

                Because of its unique mechanics and impressive defensive bonuses, the Ring of Suffering has become one of the most widely used endgame rings in OSRS. Whether you plan to craft it yourself or use accumulated OSRS gold to purchase it, understanding the full process of obtaining and upgrading this ring will help you make the most of it.

                What Makes the Ring of Suffering So Powerful?

                The Ring of Suffering is one of the four Zenyte jewelry items in the game. These items are considered some of the strongest accessories available due to their powerful bonuses and usefulness in PvM content.

                The Ring of Suffering provides several key benefits:

                ·+10 to all defensive stats

                ·+4 Prayer bonus

                ·Ability to store recoil charges

                ·Automatic damage reflection when charged

                Its upgraded version, the Ring of Suffering (i), is particularly valuable. This imbued variant doubles the defensive bonuses of the ring, making it an excellent choice for tank roles and extended boss fights.

                The ring also eliminates the need to constantly replace Rings of Recoil. Instead of breaking after reflecting damage, the Ring of Suffering stores charges internally, making it far more efficient for long PvM trips.

                Step 1: Complete Monkey Madness II

                Before you can craft the Ring of Suffering, you must complete the Grandmaster quest Monkey Madness II. This quest is a major milestone in OSRS progression and unlocks access to Demonic Gorillas, which are the primary source of Zenyte shards.

                Monkey Madness II has several demanding requirements, including high combat stats and completion of multiple prerequisite quests. The quest itself involves challenging battles and mechanics, so bringing strong gear and supplies is highly recommended.

                Completing this quest is essential not only for crafting Zenyte jewelry but also for accessing one of the most profitable monster farming methods in the game.

                Step 2: Obtain a Zenyte Shard

                The most important component required to craft the Ring of Suffering is the Zenyte shard. These shards are dropped by Demonic Gorillas, which become accessible after finishing Monkey Madness II.

                However, Zenyte shards are relatively rare drops, meaning you may need to defeat many gorillas before obtaining one. Efficient combat setups with serious damage output can significantly improve your farming speed.

                For players who prefer to skip the grind, another option is purchasing a Zenyte shard directly from the Grand Exchange using accumulated OSRS gold. Many players earn gold through bossing, skilling, or flipping items before choosing to buy OSRS items like Zenyte shards to save time.

                Step 3: Craft a Zenyte Ring

                Once you have obtained a Zenyte shard, the next step is crafting the base Zenyte ring.

                To create it, you will need:

                ·1 Zenyte shard

                ·1 Gold bar

                ·A furnace

                ·89 Crafting (or 87 with a +2 boost)

                Simply use the Zenyte shard on a furnace while carrying a gold bar to create the unenchanted Zenyte ring.

                If you do not have the required Crafting level, you can temporarily boost using a Spicy Stew, although this method is somewhat unreliable due to its random stat boosts. Alternatively, some players ask trusted friends or clan members to craft the ring for them.

                Crafting Zenyte jewelry can be expensive, which is why many players gather additional OSRS gold before starting the process.

                Step 4: Enchant the Zenyte Ring

                After crafting the Zenyte ring, the next step is enchanting it into the Ring of Suffering.

                This requires:

                ·Level 93 Magic

                ·Enchant Level 7 Jewelry spell

                ·20 Soul runes

                ·20 Blood runes

                ·1 Cosmic rune

                Casting the enchantment spell on the Zenyte ring will transform it into the Ring of Suffering.

                Training Magic to level 93 can be time-consuming, but methods such as bursting Slayer tasks, high-level alchemy, and combat training can speed up the process. Many players also invest their OSRS gold into efficient Magic training methods to reach this requirement faster.

                Step 5: Charge the Ring of Suffering

                The Ring of Suffering must be charged with Rings of Recoil to activate its damage reflection ability.

                Each Ring of Recoil provides 40 recoil charges, and the Ring of Suffering can store up to 100,000 charges, equivalent to 2,500 Rings of Recoil.

                Charging the ring is simple:

                1. Right-click the Ring of Suffering

                2. Select “Check.”

                3. Use Rings of Recoil on the ring

                Once charged, the ring automatically reflects damage without breaking. This feature makes it extremely useful for long bossing sessions where inventory space and supply management are critical.

                Optional Step: Imbue the Ring

                To unlock the full potential of the ring, most players choose to imbue it, creating the Ring of Suffering (i).

                Imbuing doubles the ring’s defensive bonuses and significantly increases its overall effectiveness.

                You can imbue the ring through two main activities:

                ·Nightmare Zone

                ·Soul Wars

                Nightmare Zone is generally considered the more AFK-friendly option, while Soul Wars can provide faster points depending on your playstyle.

                Best Situations to Use the Ring of Suffering

                The Ring of Suffering shines in situations where defense and recoil damage are valuable. It is commonly used in activities such as:

                ·Zulrah boss fights

                ·God Wars Dungeon tank roles

                ·Wilderness bossing

                ·Extended PvM encounters

                Because it stores recoil charges internally, the ring greatly reduces inventory clutter while providing consistent passive damage.

                Many players consider it one of the most practical defensive accessories in the game, especially when combined with other high-end gear.

                Is the Ring of Suffering Worth the Investment?

                The Ring of Suffering is typically one of the more expensive Zenyte jewelry pieces. Farming Demonic Gorillas, leveling Crafting and Magic, and acquiring recoil rings can require significant time and resources.

                For players with limited time, building up OSRS gold through bossing, skilling, or trading can be the fastest way to obtain the necessary materials. Some players even choose to buy OSRS items like Zenyte shards directly from the Grand Exchange to speed up their progression.

                Despite the upfront cost, the ring quickly pays for itself through improved survivability, reduced supply usage, and greater efficiency during boss fights.

                Final Thoughts

                Obtaining the Ring of Suffering in Old School RuneScape requires dedication and planning. From completing Monkey Madness II to farming a Zenyte shard, crafting the ring, enchanting it, and charging it properly, the process involves several steps.

                However, the reward is well worth the effort. With its exceptional defensive bonuses, built-in recoil storage, and strong synergy with high-level PvM content, the Ring of Suffering remains one of the most valuable accessories in the game.

                If you are serious about tackling bosses like Zulrah or taking on challenging PvM content, the Ring of Suffering is an item that deserves a place in your gear setup.

                The Ultimate Hawker HX Class Setup for Call of Duty:Black Ops 7

                One of Call of Duty most iconic sniper rifles has made its comeback in Black Ops 7. Formerly known as the Ballista, the weapon now returns as the Hawker HX, a bolt-action sniper built for speed, precision, and aggressive play. When configured properly, the Hawker HX becomes one of the most lethal quickscoping rifles in the game, rewarding confident aim and fast reactions.

                The Hawker HX shines when optimized for handling. Its greatest strengths are fast aim-down-sight speed, rapid rechamber time, and consistent one-shot kills. This build prioritizes mobility and responsiveness while keeping recoil under control, allowing you to chain shots without losing momentum. It’s ideal for players who enjoy pushing lanes, challenging angles, and staying constantly on the move.

                This setup is designed specifically for aggressive sniping, focusing on quick ADS times, smooth quickscopes, and reliable follow-up shots.

                Optic:Iron Sight

                Improves ADS speed and reduces idle sway, offering a clean sight picture for fast reactions.

                Muzzle:SWF Tishina-11

                Keeps shots suppressed and prevents your firing position from appearing on the mini-map.

                Barrel:20.5″ Hawker Spring Barrel

                Boosts ADS speed and sprint-to-fire time, making the rifle feel lighter and more responsive.

                Underbarrel:Hawker Ridge Grip

                Tightens horizontal recoil to help stabilize the weapon after firing.

                Magazine:.338 Hawker Extension Mag

                Expands the magazine to 10 rounds, reducing reload frequency during streaks.

                Rear Grip:Auroral Light Grip

                Enhances ADS speed and jumping ADS performance for aggressive movement plays.

                Laser:5MW Lockstep Laser

                Improves hipfire-to-ADS transition accuracy, helping in emergency close-range fights.

                Fire Mods:Light Bolt

                Speeds up rechamber time and slightly increases fire rate, allowing faster follow-up shots.

                This attachment combination transforms the Hawker HX into a true quickscoping machine. The Iron Sight may feel unusual at first if you’re accustomed to traditional sniper scopes, but the faster ADS and clearer view make it ideal for mid-range engagements and rapid target acquisition.

                Key attachments like the Hawker Spring Barrel, Auroral Light Grip, and Light Bolt significantly improve weapon handling, allowing you to aim faster, recover quicker between shots, and maintain pressure during fast-paced encounters. The Hawker Ridge Grip helps offset recoil after each shot, keeping your follow-ups accurate and controlled.MMOexp Black Ops 7 Bot Lobbies give you a controlled, stress-free environment to unlock gear, refine strategies, and master Zombies mechanics at your own pace. Train smarter, progress faster, and step into live matches fully prepared.

                The SWF Tishina-11 suppressor rounds out the build by keeping you hidden while firing, which is crucial for aggressive flanking and repositioning.

                Best Hawker HX Class Setup in Black Ops 7

                A fast sniper requires a class built around speed, survivability, and momentum. This setup complements the Hawker HX’s aggressive nature and keeps you lethal from one engagement to the next.

                Recommended Class Setup

                Wildcard:Gunfighter

                Secondary:Personal preference

                Melee:Personal preference

                Field Upgrade:Mute Field

                Tactical:Stim Shot

                Lethal:Semtex

                Perk 1:Lightweight

                Perk 2:Scavenger

                Perk 3:Dexterity

                Combat Specialty:Enforcer

                The Gunfighter Wildcard is essential for this build, as it allows you to equip all eight attachments and fully unlock the Hawker HX’s quickscoping potential. Mute Field is the ideal Field Upgrade for aggressive snipers, granting the effects of Ninja, Ghost, and Cold Blooded. This lets you move quietly, stay off enemy radar, and take unexpected routes without being detected.

                Stim Shot is a core piece of the setup, providing instant healing and a brief speed boost. This makes it easier to re-engage after a kill or escape dangerous situations. Semtex offers a reliable explosive option for clearing objectives or finishing off enemies behind cover.

                Best Perks for Hawker HX Quickscoping

                The perk selection is designed to keep you moving and minimize downtime between fights:

                Lightweight improves overall mobility, especially after slides and dives.

                Scavenger ensures a steady supply of ammo and equipment during extended streaks.

                Dexterity reduces weapon movement and improves handling consistency, leading to cleaner shots.

                Equipping all three red perks activates the Enforcer Combat Specialty, granting increased movement speed and faster health regeneration after every kill. This synergy is perfect for aggressive quickscopers who thrive on constant pressure, whether you’re grinding Multiplayer or warming up after you cheap CoD BO7 Bot Lobbies.

                The Hawker HX is one of the most satisfying sniper rifles to use in Black Ops 7 Multiplayer when built correctly. With fast ADS speeds, rapid rechambering, and a movement-focused class setup, this loadout allows you to quickscope efficiently, stay mobile, and dominate close-to-mid-range engagements.

                Diablo 4 Season 11: Best S-Tier Necromancer Builds for Endgame Content

                While Paladins have dominated Diablo 4 Season 11, the Necromancer continues to stand tall as one of the strongest and most reliable endgame classes. With several S-Tier builds performing exceptionally well across Nightmare Dungeons, The Pit, and high-level Helltides, Necromancers remain a top choice for players who enjoy a mix of strategic gameplay, explosive damage, and powerful class mechanics.

                Necromancer builds in Season 11 are notably versatile, blending minion control, spell-based burst damage, and unique resource interactions. While the class may not have the sheer volume of viable setups that Paladins enjoy this season, the following four S-Tier Necromancer builds stand out for their power, consistency, and widespread popularity within the community.

                1) Golem Necromancer

                One of the biggest surprises of Season 11, the Golem Necromancer has quickly emerged as a meta-defining build. Unlike traditional minion setups, this build sacrifices Skeleton Warriors and Frost Mages to dramatically amplify Golem damage and utility.

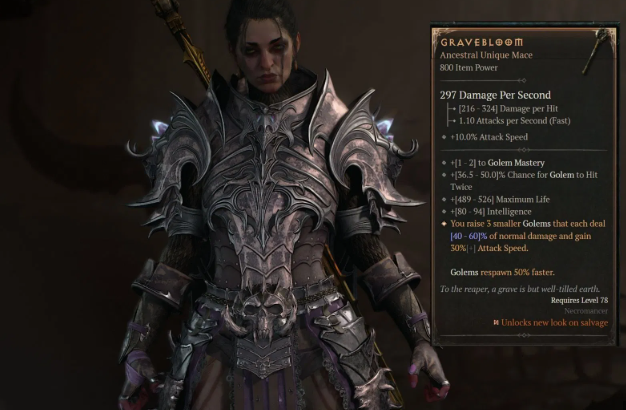
                The core of the build revolves around the Gravebloom Unique, which transforms a single Golem into three smaller, faster Golems, massively increasing crowd control and area damage. Supporting Uniques such as Blood Moon Breeches and the optional Godslayer Crown further push the build into S-Tier territory.

                Gameplay Rotation:

                1. Trap enemies using Corpse Tendrils and Bone Prison

                2. Activate Soulrift to maintain buffs and Essence generation

                3. Let your Golems overwhelm enemies with relentless damage

                While single-target boss damage can lag slightly compared to other Necromancer builds, Golem Necromancer absolutely dominates dense enemy packs. Players looking to gear up quickly often rely on crafting or upgrading key Diablo 4 Items, or choose to buy Diablo 4 materials to accelerate progression.

                2) Blood Wave Necromancer

                The Blood Wave Necromancer is a long-standing meta favorite that remains incredibly effective in Season 11. This build blends Blood and Shadow damage, unleashing massive waves of AoE destruction while maintaining strong survivability through Blood Mist and Corpse-based mechanics.

                Essential Uniques include Kessime’s Legacy and the Fastblood Legendary Aspect, both of which enhance damage uptime and reduce cooldowns. Unlike minion builds, Blood Wave sacrifices all summons, focusing entirely on spellcasting and Overpower scaling.

                Gameplay Rotation:

                1. Cast Blood Wave on grouped enemies

                2. Use Corpse Explosion to generate corpses and amplify damage

                3. Carefully activate Blood Mist, managing Rathma’s Vigor stacks

                Proper management of Rathma’s Vigor is critical, as mistimed Overpower procs can severely reduce damage output. When played correctly, Blood Wave Necromancer excels in Helltides, dungeon farming, and Pit pushing, especially when paired with optimized Diablo 4 Items or when players choose to buy Diablo IV Items to round out missing gear slots.

                3) Shadowblight Necromancer

                The Shadowblight Necromancer stands out as one of the most accessible S-Tier builds in Season 11. Its biggest advantage is that it does not require specific Uniques to function at a high level, making it ideal for players early in endgame progression.

                That said, Uniques such as Blood Moon Breeches and Godslayer Crown, along with the Cursed Aura Legendary Aspect, significantly enhance the build’s performance.

                Gameplay Rotation:

                1. Activate Soulrift to establish buffs

                2. Use Reap to generate corpses

                3. Pull enemies together with Corpse Tendrils

                4. Cast Blight and Corpse Explosion to stack Shadowblight

                Against bosses, Supernatural Sever is used to generate the first corpse quickly. Shadowblight Necromancer shines in group content, Nightmare Dungeons, and sustained fights, offering excellent damage with relatively low gear requirements.

                4) Minion Necromancer

                The classic Minion Necromancer remains an S-Tier contender thanks to the overwhelming damage and survivability provided by Skeleton Mages. While slightly squishier than other builds, its straightforward gameplay and sustained DPS make it a favorite among both new and veteran players.

                Key Uniques include Hand of Naz, Ring of Mendeln, and Blood Moon Breeches, all of which significantly boost minion damage and durability.

                Gameplay Rotation:

                1. Cast Blight to increase enemy damage taken

                2. Use Corpse Tendrils to group enemies

                3. Maintain buffs with Raise Skeleton

                4. Activate Soulrift to sustain Essence and cooldowns

                Although boss fights can become more difficult if minions die frequently, the build excels in long encounters and large dungeon clears, making it one of the most reliable Necromancer setups in Season 11.

                Why These Necromancer Builds Are S-Tier

                These four builds-Golem, Blood Wave, Shadowblight, and Minion Necromancer-earn their S-Tier ranking due to several shared strengths:

                ·Endgame viability: Strong performance in Nightmare Dungeons, Helltides, and The Pit

                ·Scalability: Effective in both solo and group play

                ·Accessibility: Achievable through smart farming, optimized Diablo 4 Items, or choosing to buy Diablo 4 materials to speed up gearing

                ·Engaging gameplay: Each build offers a distinct and satisfying playstyle

                Optimizing Your Necromancer in Season 11

                To maximize any S-Tier Necromancer build, focus on:

                ·Acquiring core Uniques like Gravebloom, Hand of Naz, and Kessime’s Legacy

                ·Optimizing Legendary Aspects such as Fastblood, Cursed Aura, and Blood Mist

                ·Investing in Paragon Boards and Rune combinations that improve cooldown reduction, damage scaling, and survivability

                ·Testing builds in group content using Party Finder, where Necromancers truly shine

                Conclusion

                Despite Paladins dominating Diablo 4 Season 11, Necromancers remain a powerhouse class with multiple S-Tier builds capable of clearing the toughest endgame content. Whether you prefer commanding devastating Golems, unleashing Blood Waves, stacking Shadowblight, or overwhelming enemies with minions, there’s a Necromancer build perfectly suited to your playstyle.