Path of Exile:Balance of Terror Guide

The Balance of Terror stands out as one of the most flexible and valuable unique jewels in Path of Exile. Designed primarily for curse-oriented builds, this unique Cobalt Jewel can dramatically reshape how a character scales damage, defense, or utility. Although its built-in elemental resistance bonus is modest, the true strength of Balance of Terror lies in its powerful and highly variable curse-based effects.

Because of its random modifier system and guaranteed acquisition method, Balance of Terror has become both a sought-after chase item and a cornerstone of many high-end builds.Unleash your potential in Path of Exile. Get your POE currency at MMOexp today!

Balance of Terror is a unique Cobalt Jewel with a fixed base stat and two randomly selected modifiers tied directly to curse mechanics.

These curse modifiers are where the jewel truly shines. Depending on the combination rolled, Balance of Terror can grant massive offensive boosts, defensive layers, or powerful quality-of-life effects. Because certain mod pairings are extremely rare and highly synergistic, top-tier versions often command prices of several Divine Orbs and are considered premium Path of Exile Items.Don’t let a shortage of currency hold you back – get your buy Path of exile currency at MMOexp today and thrive!

How to Obtain Balance of Terror

Balance of Terror cannot drop randomly and cannot be obtained through chance or divination cards. Farming it efficiently requires understanding its exact drop conditions.

1.Defeat Lycia in the Forbidden Sanctum

    The jewel only drops from Lycia, Herald of the Scourge, under very specific circumstances:

    You must reach Lycia on the fourth floor of the Forbidden Sanctum

    Only the final Lycia encounter at the end of a full run can drop the jewel

    You must begin the run using Lycia unique Relic:The Blood of Innocence

    2.Tome Level Does Not Matter

      The level of the Forbidden Tome has no impact on the jewel drop. Many players intentionally use low-level Tomes because:

      Enemies deal less damage

      Room modifiers are more forgiving

      Runs are faster and safer

      This makes low-investment farming both efficient and consistent.

      3.Nightmare of Lycia Does NOT Drop the Jewel

        It’s important not to confuse the Sanctum version of Lycia with Nightmare of Lycia, found in the Sanctuary T17 map. While this boss has her own unique loot table, she cannot drop Balance of Terror under any circumstances.

        Balance of Terror Modifier Pool

        The jewel has 18 possible curse-related modifiers, with each Balance of Terror rolling exactly two. These modifiers interact with curses in a wide variety of ways, including:

        Effects triggered when you apply a curse

        Bonuses gained when enemies are cursed

        Defensive effects when you are affected by a curse

        On-hit or on-kill interactions with cursed enemies

        Offensive Modifier Examples

        Increased damage against enemies affected by Despair

        Attack or cast speed bonuses after applying Punishment

        Critical strike bonuses versus enemies cursed with Enfeeble

        Defensive Modifier Examples

        Reduced elemental damage taken after being affected by Elemental Weakness

        Damage reduction when enemies are affected by Temporal Chains

        Utility and Status Modifiers

        Immunity to Ignite, Chill, or Shock when using specific curses

        Movement speed or action speed bonuses when cursing enemies with Frostbite or Enfeeble

        Because the modifiers are entirely random, most players acquire or farm multiple copies before finding a combination that perfectly matches their build.

        How to Use Balance of Terror Effectively

        Balance of Terror can be socketed into any jewel slot on the passive tree. It does not require special positioning, radius scaling, or keystones.

        1.Align Mods with Your Curse Strategy

          The jewel performs best when its modifiers directly complement your playstyle.

          Curse-on-Hit builds (such as Occultist, cold DoT, or bow setups) benefit from offensive trigger effects

          Hexblast or self-curse builds gain immense value from effects that activate on curse application or self-affliction

          Support characters or aura bots can leverage defensive and utility bonuses tied to curses applied to enemies

          2.Using Multiple Balance of Terror Jewels

            You can socket multiple Balance of Terror jewels simultaneously. However:

            Identical modifiers do not stack

            Each jewel must have unique mod names to provide full value

            Well-optimized endgame characters commonly use two to four copies to maximize coverage.

            3.Extra Resistance Is a Bonus, Not the Focus

              The guaranteed elemental resistance helps with:

              Surviving resistance-reducing map modifiers

              Offsetting penalties from unique items

              Smoothing gearing during early mapping

              While not the primary reason to use the jewel, it adds welcome flexibility to character planning.

              Balance of Terror is one of Path of Exile most inventive and build-defining jewels. Its deep interaction with curse mechanics, massive modifier variety, and guaranteed farming method make it both accessible and endlessly chase-worthy.

              Call of Duty Black Ops 7 Nightmare Boss Tips, Phases, and Best Weapons

              Call of Duty: Black Ops 7 features some of the toughest and most memorable encounters in the franchise, but none are as chaotic or mechanically demanding as The Nightmare. This massive boss fight tests everything from weak-point targeting to crowd control and positioning. Whether you’re progressing through the campaign normally or sharpening your mechanics inside Call of Duty Black Ops 7 Bot Lobbies to practice aim, movement, and survival, understanding each phase of this fight is the key to victory.

              This guide breaks down every phase of The Nightmare boss fight, the best weapons to use, and how to survive the encounter even as a solo player.

              Where The Nightmare Boss Appears

              The Nightmare appears during one of the late-game campaign missions in Black Ops 7. By this point, the game expects you to have mastered movement, precision shooting, and ability usage. The fight acts as a major skill check before the final sequence of the campaign and punishes players who rely solely on raw firepower instead of smart targeting.

              How To Beat The Nightmare in Black Ops 7

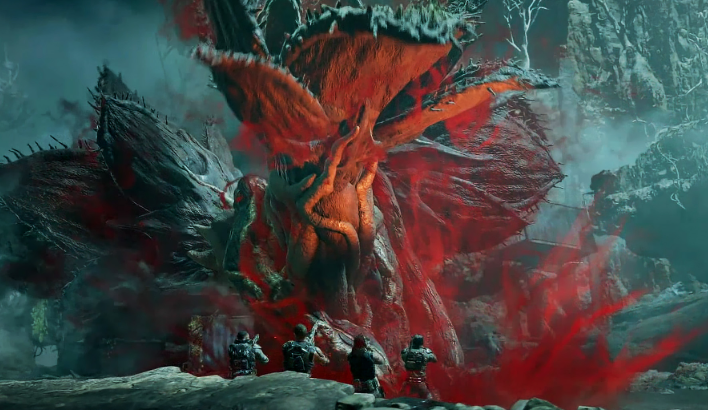
              The Nightmare is a massive, rooted plant-like creature that does not move from its central location. Instead, it attacks using area denial, tracking projectiles, and relentless waves of enemies. The boss has multiple weak points that change throughout the battle, and shooting the wrong areas wastes ammo and time.

              Success depends on target prioritization, mobility, and wave management.

              Phase 1: Destroy the Smaller Flower Buds

              At the start of the fight, several small flower buds appear along The Nightmare’s stalk. These buds resemble the ones encountered earlier in the mission and serve as the boss’s only weak points during Phase 1.

              How to Handle Phase 1

              ·Focus all fire on the small buds only

              ·Each destroyed bud removes a large chunk of the boss’s health

              ·Constantly reposition to avoid incoming attacks

              ·Maintain distance to keep all buds in view

              Best Weapons for Phase 1

              ·Sniper Rifles

              ·Designated Marksman Rifles (DMRs)

              ·Long-range Assault Rifles

              Precision and range matter more than raw damage output in this phase.

              Nightmare’s Main Attacks in Phase 1

              During Phase 1, The Nightmare cycles through two dangerous attacks.

              1. Poison Breath Attack

              The boss releases a wide cloud of toxic gas that:

              ·Deals heavy damage

              ·Causes knockback

              ·Forces players out of cover

              Counterplay: Step behind tall environmental objects just before the gas reaches you. Timing matters more than distance.

              2. Homing Projectile Pods

              The Nightmare fires glowing, slow-moving projectiles that track your position.

              Counterplay options:

              ·Sprint to break the line of sight

              ·Shoot the projectiles mid-air

              Either method works, but don’t let them pile up behind you.

              Once all small buds are destroyed, the boss becomes immune and transitions to Phase 2.

              Phase 2: Clear Zombie and Spider Waves

              In Phase 2, The Nightmare shields itself and summons waves of enemies, including:

              ·Standard zombies

              ·Mutant spiders

              ·Occasional explosive variants

              Your Objective

              Survive until the immunity shield drops.

              Tips for Phase 2

              ·Stay mobile-standing still leads to being surrounded

              ·Use grenades and abilities to thin crowds

              ·Conserve rifle ammo by switching to SMGs or shotguns

              ·Prioritize explosive enemies before they reach you

              Once the shield drops, another set of small buds appears. Destroy them while continuing to manage enemy pressure.

              Players who struggle with swarm survival often buy CoD Black Ops 7 Bot Lobbies to practice movement patterns, crowd control, and ability timing before attempting this phase in the campaign.

              Phase 3 (Final Phase): Target the Glowing Orange Weak Points

              When The Nightmare reaches roughly 30% health, the fight enters its final phase. Small buds stop spawning, and three large flower mouths open on the boss’s body.

              How the Weak Points Work

              ·Each giant flower glows orange when preparing an attack.

              ·The glow signals a damaged window.w

              ·Shooting the glowing mouth deals massive damage.

              How to Survive the Final Phase

              ·Rotate between weak points.

              ·Avoid the poison breath zone.

              ·Dodge tracking projectiles

              ·Continuously clear zombies to prevent flanks

              Tunnel vision is the biggest mistake here. Keep moving between cover and check your surroundings constantly.

              Recommended Ability: Grenade Launcher

              If you have explosive abilities saved, this is the time to use them.

              Why the Grenade Launcher Shines

              ·Massive area-of-effect damage

              ·Instantly clears zombie clusters.

              ·Deals heavy damage to glowing weak points

              Explosives dramatically shorten this phase if used correctly.

              Finishing the Fight

              When a giant flower mouth takes enough damage:

              ·It wilts

              ·Stops glowing

              ·Becomes immune

              Move immediately to the next weak point. Once all three large flowers are destroyed, The Nightmare collapses, triggering a cutscene and completing the mission.

              Tips for an Easier Nightmare Boss Fight

              ·Stay mobile at all times

              ·Only shoot weak points-body shots waste ammo

              ·Save explosives for Phase 3

              ·Use long-range weapons early, burst damage late

              ·Clear zombies quickly to avoid overwhelm

              ·Use cover smartly to counter poison attacks

              Conclusion

              The Nightmare boss fight in Call of Duty: Black Ops 7 is one of the most unique encounters in the entire campaign. Its mix of weak-point mechanics, relentless enemy waves, and environmental hazards forces players to adapt and think tactically rather than relying on brute force.

              With patience, smart positioning, and proper weapon selection, you can bring down this plant-based monstrosity and push toward the final stretch of the Black Ops 7 campaign with confidence.

              Path of Exile 2 Guide:Crafting the Best Grenade Crossbow for Every Stage

              Explosives have completely redefined ranged combat in Path of Exile 2. Skills like Shrapnel Grenade, Infernal Charge, and Frostburst Grenade allow players to play dynamically-juggling timing, positioning, and precision. But none of those abilities reach their true potential without a perfectly crafted weapon. Enter the Grenade Crossbow, the ultimate tool for any demolition-focused Exile. Whether you’re just beginning your journey through the campaign or chasing high-tier maps, knowing how to craft this weapon can make all the difference.

              In the early Acts, your focus shouldn’t be on perfection-just functionality. You’ll want a weapon that boosts your grenade skill’s base damage and scaling without draining your resources. The key is finding or creating a crossbow with “+ to Level of Socketed Skill Gems”, which directly increases your grenade power.

              Step 1:Choose a Good Base

              Start with any Crossbow that already has “Increased Level of Skill Gem” or at least an open prefix. If you can’t find one, buy a Normal base from a vendor and use Orbs of Transmutation until you land a decent modifier.

              Step 2:Add a Mod

              Use an Orb of Augmentation to add an additional random affix-ideally something that enhances Physical or Elemental Damage.

              Step 3:Use Essence of Abrasion

              Next, apply an Essence of Abrasion. This will upgrade the crossbow to Rare quality and guarantee a + (X–Y) to Physical Damage modifier-an excellent early-game damage boost.

              Step 4:Exalted Crafting (Optional)

              If you have both an Exalted Orb and an Omen of Greater Exaltation, use them together. The Omen adds one additional modifier on top of the Exalted Orb normal roll, allowing you to fill all six mod slots. If not, skip this step and settle for a solid four- to five-mod weapon.Use MMOexp to purchase instant POE 2 Currency and enhance your gaming experience.

              When you reach the later stages of the game, it’s time to upgrade to the Siege Crossbow-the ultimate grenade weapon base. It comes with an implicit modifier:

              “Grenade Skills fire an additional Projectile.”

              This single line massively increases your area damage potential, making it a must-have for all grenade builds.

              However, crafting a perfect Siege Crossbow takes time, currency, and patience. Endgame crafting often requires precise timing and a solid understanding of Omens, Essences, and RNG manipulation.

              Required Crafting Materials:

              Perfect Orb of Transmutation
              Perfect Orb of Augmentation
              Greater Essence of Abrasion
              Preserved Jawbone
              Omen of the Liege
              Omen of Sinistral Necromancy
              Exalted Orbs
              Perfect Essence of Battle
              Perfect Essence of Haste

              Endgame Crafting Steps:

              Step 1:Perfect Orb of Transmutation

              Begin with a Siege Crossbow base and apply a Perfect Orb of Transmutation to make it Magic. Aim for % Increased Physical Damage at Tier 1 or Tier 2 (155%+). If you roll lower, it’s often faster to restart with a new base.

              Step 2:Perfect Orb of Augmentation

              If your weapon only has one modifier, use a Perfect Orb of Augmentation to add another. Skip this if your base already rolled a good combination of prefix and suffix.

              Step 3:Greater Essence of Abrasion

              Next, apply a Greater Essence of Abrasion. This upgrades the item to Rare and guarantees a 35–59 flat Physical Damage roll-an important damage foundation.

              Step 4:The Desecration Combo (Preserved Jawbone + Omens)

              Activate both Omen of the Liege and Omen of Sinistral Necromancy, then use a Preserved Jawbone on your crossbow.

              Omen of the Liege-forces the new modifier to appear as a prefix.

              Omen of Sinistral Necromancy-guarantees the modifier is an Amanamu (chaos-based) mod.

              This is the pinnacle prefix for any grenade build and the defining trait of a true endgame Grenade Crossbow.

              Step 5:Fill Out the Mods

              Use Exalted Orbs to add random affixes until you have six total (three prefixes, three suffixes). Try to lock in your main prefixes first before expanding the rest.

              Step 6:Perfect Essence of Haste

              Finally, apply a Perfect Essence of Haste. This adds (20–25)% Chance to Gain Onslaught on Kill, enhancing your mobility and attack speed. Since Essences can overwrite a random modifier, ensure your desired affixes are secured beforehand.

              Crafting in Path of Exile 2 is equal parts strategy and chaos. Each click can lead to triumph or heartbreak-but when you finally create that perfect Grenade Crossbow, it’s one of the most rewarding moments in the entire game.

              If farming materials isn’t your style, you can always speed up your progress with MMOexp, where you can safely buy Path of Exile 2 Currency to support your crafting ambitions.

              Master the art of grenade crafting, and every explosion you trigger will feel like poetry in motion-deadly, stylish, and unmistakably yours.

              Path of Exile 2: Best XP Tower Farming Strategies for Fast Leveling

              Leveling a second character in Path of Exile 2 can feel daunting, especially if you want to skip paying for Untainted Paradise leveling services. However, after Patch 0.3.1, a high-efficiency strategy has emerged that allows players to maximize experience gain using XP Towers – a system built around Tablets, monster density scaling, and smart Atlas optimization.

              This guide breaks down everything you need to know – from Tablet configurations and Tower placement to Atlas Tree planning – to power level efficiently and safely.

              Overview of the XP Tower Strategy

              The XP Tower strategy is a late-game leveling method centered around Tablet modifiers that increase experience gain and monster pack density within maps. When set up correctly, it creates overlapping map effects that dramatically amplify XP per hour.

              This method is not suited for your first league character due to its gear and currency requirements, but for an established account, it’s one of the most efficient leveling methods currently available.

              How It Works

              ·XP Towers are areas affected by nearby Tablets that grant specific map modifiers.

              ·By stacking Tablets with experience-boosting and monster density modifiers, you can multiply XP gain rates.

              ·The strategy shines when used with Breach Tablets and Irradiated Precursor Tablets, creating a chain reaction of dense enemy spawns and high-value rewards.

              Tablets: The Heart of XP Towers

              Tablets form the core of the XP Tower strategy. You’ll primarily use Breach Tablets and Irradiated Precursor Tablets, as these directly boost XP yield and monster levels.

              Recommended Setup

              Each Tower should have at least three Tablets, ideally configured with the following priorities:

              1. Mandatory Modifier:

              ·5-10% increased Experience Gain in your Maps.

              2. Bonus Modifiers:

              ·Chance for Maps with a Breach to spawn additional Breaches.

              ·Increased number of Rare or Magic monsters.

              ·Modifiers that add monsters through Strongboxes, Shrines, or other encounter types.

              Why These Matter

              ·Irradiated Tablets raise nearby area levels by +1, increasing monster difficulty and XP.

              ·Breach Tablets spawn massive waves of enemies, compounding XP gain.

              ·When strategically placed, overlapping Tablet effects can yield up to 30-60% increased experience gain across affected Maps.

              Towers: Placement and Usage

              Proper Tower placement determines how much XP you can achieve. For maximum benefit, aim for double-Tower overlap, where two Towers affect the same Map.

              Setup Requirements

              ·Run the Tower with a 6-modifier Rare Map to unlock all three Tablet slots.

              ·Slot in one Irradiated Tablet and one Breach Tablet, and use a third with an XP Gain modifier.

              ·Overlapping Towers multiply their effects, creating zones of extremely high monster density and XP potential.

              If you can’t create double overlaps, a single Tower still offers significant benefits – particularly if you combine it with other XP-enhancing methods.

              Bonus Tip: Clearing Corruption near Towers adds extra monster packs and modifiers, further increasing your XP per hour.

              Optimizing Maps for XP Farming

              The best XP gains come from high-density maps. Here’s how to optimize your maps for maximum experience efficiency:

              1. Omen of Chaotic Quantity

              ·Apply to a Map with 4-6 modifiers, then use a Chaos Orb.

              ·This randomizes map modifiers and often grants increased monster pack size, which directly scales XP.

              2. Diluted Liquid Guilt

              ·Use Diluted Liquid Guilt on your Map Device to boost pack size even further.

              ·These consumables are easy to acquire and offer a low-cost way to enhance density.

              3. Desecrated Modifiers

              ·Apply a Preserved Vertebrae to add Desecrated Modifiers to your Map.

              Desecrated Prefixes can:

              ·Increase the number of Magic monsters in the Abyss.

              ·Boost XP yield from specific monster types.

              These modifiers are particularly powerful in Maps Overrun by the Abyss, making them top-tier XP choices.

              4. Permanent Buff in Qimah

              ·Adjust your Permanent Buff to grant 5% increased experience in exchange for reduced other bonuses.

              ·This small adjustment adds up over extended farming sessions.

              When stacked together, these modifiers can transform regular maps into XP-rich battlefields. Just make sure your character can handle the increased monster damage and density – survivability is key.

              Power Leveling with the Atlas Tree

              Your Atlas Passive Tree is the backbone of this strategy, amplifying map modifiers and Tablet effects.

              Key Atlas Strategies

              ·Allocate Pack Size Nodes: Boosts overall monster density and XP per run.

              ·Enhance Shrine Mechanics: Prioritize Enlightening Shrines using the Shrine Type Selector for a temporary but powerful XP boost.

              ·Tablet and Breach Nodes: These further scale monster count and area level synergy.

              Pro Tip: High-density maps can be dangerous. If your character struggles with survivability, invest in defense first. Losing XP to deaths negates any efficiency gains.

              Extra Tips for XP Tower Efficiency

              To maximize XP per hour and ensure a smooth power-leveling experience, keep these advanced strategies in mind:

              1. Cleansed Maps

              Clearing Corruption around your Towers adds additional monster packs and map modifiers. This increases both loot quality and XP efficiency per run.

              2. Overrun by the Abyss

              Maps with this tag are perfect for XP farming. When enhanced with Desecrated Modifiers and Breach Tablets, these areas can reach unparalleled monster density.

              3. Gear and Item Optimization

              Since this method scales with your ability to kill rapidly, invest in high-AoE gear and sustain builds.

              Buying early Path of Exile 2 Items can make a massive difference in efficiency. For example, upgrading your damage and sustain gear – or choosing to buy POE2 Items directly – ensures you can comfortably handle high-mod maps without downtime.

              4. Tablet Positioning

              Proper Tablet placement is crucial. Always prioritize modifiers that:

              ·Increase monster pack size

              ·Boost XP gain

              ·Add new monster sources (Shrines, Breaches, Strongboxes)

              Avoid wasting slots on low-impact bonuses that don’t scale with density or XP.

              Conclusion: Level Smarter, Not Harder

              The XP Tower strategy offers one of the most efficient and rewarding ways to power level in Path of Exile 2. By intelligently combining Tablet setups, high-density Maps, and Atlas Tree synergies, players can achieve staggering XP rates for secondary characters – often rivaling Untainted Paradise efficiency without external services.

              This strategy demands planning and investment, but the payoff is worth it. You’ll not only level faster but also generate valuable loot, including rare Path of Exile 2 Items and Path of Exile 2 Currency, while refining your mapping skills.

              In summary:

              ·Build your XP Towers with overlapping Tablets.

              ·Optimize your Maps with Omens, Liquids, and Desecrated Mods.

              ·Align your Atlas Tree for maximum pack size and XP gains.

              ·Balance your build for both damage and survivability.

              Follow these steps, and your secondary characters will hit endgame levels in record time – no Untainted Paradise runs required.

              Poison Bear Druid Guide in Diablo 4 Season 10

              With Diablo 4’s Season 10 rolling out, players are looking for fresh, powerful builds to take on the game’s many challenges. The Poison Bear Druid, in particular, has been gaining attention for its unique synergy between shapeshifting, poison damage, and Druid-specific skills. This build offers a dynamic playstyle that focuses on applying poison damage over time while utilizing the ferocity of the Werebear form to deliver devastating attacks. In this guide, we’ll cover everything you need to know to make the most out of the Poison Bear Druid in Diablo 4’s Season 10. Understanding this article will help you make better use of your Diablo 4 Gold and other resources.

              Why Choose Poison Bear Druid?

              The Druid class in Diablo 4 offers a wide variety of builds, from elemental spellcasters to shape-shifting berserkers. The Poison Bear Druid stands out due to its hybrid nature. It combines the tanky, high-damage potential of the Werebear form with poison as a main damage-over-time (DoT) mechanic, providing both sustained and burst damage.

              Advantages of the Poison Bear Druid Build:

              Tankiness: The Werebear form increases survivability due to higher health, defense, and natural resistances.

              Sustained Damage: Poison damage allows you to weaken enemies over time, ensuring that they take damage even if you aren’t constantly attacking.

              Synergy: The Poison Bear build takes full advantage of the Druid’s passives, which can boost poison damage, crowd control, and enhance the effectiveness of shapeshifting.

              Versatility: This build is viable in both solo play and group content, as it can handle crowds of enemies while contributing substantial damage.

              Key Skills for Poison Bear Druid Build

              To create an effective Poison Bear Druid, you’ll want to focus on skills that augment poison damage, improve your shapeshifting abilities, and boost survivability. Below are some of the most important skills to focus on:

              1. Shape Shifting Skills:

              Werebear Form: This is the foundation of your build. When in Werebear form, you gain increased health, armor, and crowd control resistance. Your basic attacks will transform into mighty slams, and you’ll be able to deal higher damage while taking reduced damage. The Werebear form also allows you to use specific skills that enhance your poison-based damage.

              Shapeshifting Mastery: This passive boosts the overall effectiveness of your shapeshifting abilities, reducing cooldowns and making transitions smoother. You’ll want this passive for maximum efficiency.

              2. Poison Damage Skills:

              Poison Creeper: A great skill for the Poison Bear Druid. When activated, this ability summons a poison-infested vine that damages enemies over time. The vines can spread to multiple enemies and significantly increase your overall poison output.

              Venomous Rebirth: This passive allows you to apply poison damage to your basic attacks in Werebear form. Each time you land a basic attack, your target will receive poison damage over a short period. It’s a great way to ensure that enemies are constantly under the effects of poison.

              Toxic Claws: When using your Werebear form, you can transform your claws into toxic-infused weapons. This boosts the damage of your attacks and adds poison DoT effects, ensuring that enemies you strike continue to suffer.

              3. Utility and Crowd Control:

              Grizzly Rage: One of the key ultimate abilities for the Poison Bear Druid. Grizzly Rage increases your damage output and grants you the ability to strike harder with poison-infused attacks. The additional damage you get from Grizzly Rage will complement your poison-based attacks, making your werebear form even more formidable.

              Landslide: This skill helps control the battlefield by causing the earth beneath your enemies to tremble. It’s useful for setting up combos and displacing enemies, giving you better positioning to land your poison attacks.

              Feral Rage: This skill provides you with a powerful buff that grants increased movement speed, attack speed, and critical strike chance when you’re in Werebear form. Use it to get in and out of battle more efficiently and deal damage at a faster rate.

              Stat Priority for Poison Bear Druid

              To optimize your Poison Bear Druid for Season 10, focusing on the right stats is crucial. Here’s what you’ll want to prioritize:

              Poison Damage: Since poison is your primary damage source, any gear that boosts poison damage or poison DoT effects should be your top priority.

              Health: Werebear form already boosts your health, but more health on your gear means you’ll be even tankier. With increased health, you can also sustain longer fights and get the most out of your poison DoTs.

              Attack Speed: In Werebear form, you want to maximize your attack speed to ensure that your poison attacks land quickly and apply the DoT effect as much as possible.

              Critical Hit Chance and Damage: Critical hits in Werebear form deal devastating amounts of damage, especially with poison-enhanced attacks. Investing in critical hit chance and critical damage will enhance both your burst and sustained damage output.

              Cooldown Reduction: Skills like Grizzly Rage and Landslide benefit greatly from cooldown reduction. Lower cooldowns mean more frequent bursts of power and greater utility in combat.

              Gear and Legendary Aspects

              For the Poison Bear Druid build, certain gear pieces and Legendary Aspects will give you the edge you need to dominate in Season 10. Here are some of the key items to look for:

              Legendary Aspect of the Poisoned Beast: This aspect can be applied to your gear and significantly boosts your poison damage and DoT effects. It allows you to apply additional poison effects when attacking with Werebear abilities, making it a must-have for this build.

              Aspect of the Grizzly: This aspect boosts the power of your Grizzly Rage ultimate ability, increasing your damage output and providing a higher chance of survival during intense fights.

              Aspect of the Tempest: Increases your mobility while also providing extra damage for your poison-infused attacks, allowing you to move quickly and deal damage to multiple targets at once.

              High Armor and Resistances: Gear that increases your armor and resistances will keep you safe while in the thick of battle. The Poison Bear Druid is a tanky build, but you still need to mitigate incoming damage.

              Playstyle and Strategy

              The Poison Bear Druid build requires a mix of tankiness and sustained damage. Here’s a breakdown of the best approach for this playstyle:

              Start in Werebear Form: When engaging enemies, begin by shifting into your Werebear form. This form will make you tanky and allow you to unleash powerful melee attacks.

              Apply Poison Effects: Use skills like Venomous Rebirth and Toxic Claws to apply poison to enemies. This ensures that they’re taking continuous damage over time, even when you’re not directly attacking them.

              Control the Field with Landslide and Grizzly Rage: Use Landslide to crowd control enemies and set up your next attacks. When you activate Grizzly Rage, go all-in with your poison-based abilities to maximize your damage output.

              Survive and Sustain: Keep yourself topped off on health with your passive healing effects and make use of your high resistances. The build allows you to take punishment while dealing steady damage to enemies.

              Conclusion

              The Poison Bear Druid in Diablo 4 Season 10 is a versatile, tanky build that combines the brute strength of the Werebear with the consistent damage output of poison. If you want to become stronger quickly, you can also buy Diablo 4 Items on mmoexp. With the right gear, skill choices, and stat allocation, you can crush enemies while withstanding substantial punishment. Whether you’re tackling the latest seasonal content or grinding through endgame activities, this build provides an exciting and powerful option to explore. So, get ready to embrace the primal forces of nature and let your enemies succumb to the power of poison!